Friday, October 19, 2012

Easy Peasy Kids superhero cape

For X-man's Superhero birthday we decided to make kids got caps, cuffs, & masks. When I decided to make the caps I went out and priced fabric and realized it was going to be three to four dollars per kid! Since we ended up with 23 RSVP's there was no way I was going to be able to make that happen. While walking through the dollar tree I found a new section full of - wait for it - dollar t-shirts!!!! I looked them over and realized I could totally make capes out of them! So I had capes for every kid for a dollar per kid!

The advantage of the t-shirts is that the seams are already sewn so once you cut the cape out it virtually done. Remember to wash your shirts to take the sizing out of them and pre-shrink them. Otherwise you may end up with a crooked cape!

What you will need: 
  • T-shirt (our kids are 5 so an adult size large worked best for us)
  • Scissors 
  • felt (if you are going to make a logo)


First lay out your shirt and look it over. If it has seams you will want to use them as your guide. I got lucky and the shirts from the dollar tree did not have seams up the sides which meant wider bottoms for the capes.


Next cut up the side of the cape all the way up to the armpit and continue to cut along the backside of the sleeve until you reach the top seam. Do this to both sides of the shirt. The front of my shirt is to the right and you can see I cut diagonally up to the armpit to allow more fabric for the cape


Once you have cut the sides of your shit lay it flat. Cut along the top seam and around the underside of the collar until it looks like the picture above. Then you will want to even out the cut from the collar to the side so it looks like more of the below image. 


Finally you will want to cut the collar of your shit at the middle point. You can add Velcro which is safer for kids to play in. If they get stuck on something it will automatically pull off. 

Now  you can add any sort of image on the back you wish. I cut stars, lighting bolts and bats out of felt and used fabric glue to hold them on. 


Happy Cape Crusading!
Jen

Wednesday, October 17, 2012

Childs Faucet Extender

Not to long ago our two year old decided he wanted to do everything himself. I don't usually mind except when it comes to things like scaling the sink to wash his hands. Our issue - our sinks are so tall that even with a really high children's step stool he still can't reach the faucet! So i created a 'faucet extender' to make the water reach his little hands!

What you need:

  • Scissors 
  • large squarish bottle ( I used a Costco sized Pantiene bottle but any squarish plastic bottle will do)
  • a faucet to attach it to!


The first thing I did was cut a hole in the top of my bottle.

Then I cut off the top of the bottle. I took a look to see where our faucet would need to go through the bottle. I cut a large U shape out of the bottle and rounded the top corners so not to poke little hands.


That's it! As you can see our faucet is a very odd shape. Yours will probably look a bit different.

Happy DIYing!
Jen

Monday, October 15, 2012

DIY Cleaning Wipes

There was a point in time when I spent a small fortune on cleaning wipes. You have to admit they make life so much easier but boy are they expensive! Shortly after having our second son and was exposed to the fabulousness of reusable diapers. Then one day it hit me. Why couldn't I do the same for my cleaning wipes? It really isn't hard to make these. The hardest part is cutting up the towel to make the little wipes.
 
The fist thing I did is measure the size of my container I would be leaving my wipes in and I cut my wipes to fold once and fit in my container.

 
Here are the ingredients for the wipes. Pine Sol, water, a measuring cup a plastic sealable container (purchased at Target) and the towels for the wipes. This recipe is best for killing germs and such. There are other recipes that use vinegar but I noticed they turn sour fairly quickly. 
For this project  I happened to have a package of small working towels from the auto parts store but you can use whatever suits your fancy. Even a cut up old t-shirt will work.  
 
DIY Cleaning wipes recipe:
2 1/2 Cups of water
1/2 Cup of Pine Sol
 
First you will want to fold and put your towels in the container. Then pour the water over the towels.


Immediately after pour the Pine Sol. 

 
Then seal the container. Let all of the fluid sink to the bottom and then flip it upside down.


You will probably want to wait about a half hour to make sure all the liquid has been absorbed by the towels. Then you can clean to your hearts content. Well at least until you need to make them again! Once they have been used I just put them in the laundry with the rest of our towels to wash.

Happy DIYing!
Jen

Thursday, October 11, 2012

DIY Bisquick Mix

I love Bisquick but I haven't been very fond of all the ingredients they use to make it. So I looked on the Internet and found that its totally possible to recreate the mix. But please note that this version needs to be put in the freezer as it does not have the preservatives in it that make it shelf stable.
 
Here are the ingredients.
Butter, Flower, Salt, & Baking power
 
You can use Bisquick mix to make so many things. Waffles, Pancakes, biscuits, and cookies. I could go on and on but I'll spare you.
Recipe:
3 Cups - Flower
1.5 Tsp - Baking Powder
.5 Tsp - Salt
1/4Cup - Butter
 
This can totally be made by hand with a pastry cutter but it takes much longer and I'm lazy! So with the food processor method you want to cut up your cold butter into small chunks add your other ingredients and place them in the blender. I usually blend it on the blend setting for approximately 2 minutes.

 
Once your done blending it should look something like this.
The butter should be completely processed in at the end of two minutes. I like to fill a large pitcher full of the mix. That way it has a handle to carry it around with. It and it usually takes 4 batches to fill the pitcher completely full.  As you can see I keep the recipes I use the most on the side of my pitcher and of course the original recipe to make the mix.
 
Happy DIYing!
Jen
 

Saturday, September 15, 2012

Birthday breakfast in bed.

I just received my first birthday present of the day. Breakfast in bed from my favorite Kindergartener ( I'm sure he had some help from dad). What was your favorite birthday experience?

Wednesday, September 12, 2012

Modge-Podge Birthday Letters


We are full speed ahead planning for Xavier's 5th birthday bash at the end of this month. Here is project one of at least 20: Modge-Podge Letters. 

For the letters I made my own modge-podge because, lets face it, times are toughand I'm cheap. It worked like a charm and easy as pie to make. Half cheap-o Dollar Tree white glue the other half water.

What you willneed:
Modge-podge
small foam brush
cardboard letters (I got mine from Joann's)
material you willglue onto your letter

So the first stepis to cut out what you are going to modge-podge to your letter. I cut outimages from comic books I purchased from the second hand store.

Next place a niceamount of glue onto the surface of your letter and position your paper onto theletter. 

Place the cut paper onto your letter with glue on it. Then apply a thin layer of modge-podge on top of your paper. You want to make sure your paper is saturated with the solution enough that it is 'wet' but not so much that there are beads of clue laying on top. 

Now wait for it to dry. 

I applied the paper only to the front of the letter and painted the sides and back. But you may want to modge-podge the sides. Don't hesitate to get creative!

Till next time!
Jen

The Super Party Begins!

Our oldest son's birthday is in September and usually by this time the majority of the work is done. This year as many of you probably already know I started a new job. So every waking second not spent on my family I either spend out in the garden or working.

Xavier requested a superhero birthday party this year. We finally  finished the invites and sent them out this week. My fabulous husband did an awesome job putting them together. And we saved so much money doing them ourselves. Here is the front the back is done box style in the comic theme.


 How do you like to put together your children's birthday invitations. Do you prefer buying them or making them yourself?

More party planning to come stay tuned!

Saturday, August 11, 2012

Logan's Pirate Party


This has taken me FOREVER to actually post. Logan's birthday was actually back in February but after all this superhero party planning I had to get them up. So here is the infamous Pirate party.


We made an x to mark the spot instead if the traditional balloons and if course a pirate flag flew over the house.


The kids were greeted by a live pirate who helped them get pirate ready with a bandana, hat, sword, spyglass and tattoo (temporary of course).


Of course no pirate is can be without his ship. I got lucky and our regular bouncy house company we use had the ship available.

We had boat dogs and grog and a treasure chest cake made from scratch.  


The kids had a blast and we played pirate music. The ended the party with a treat bag filled with rock candy and chocolate cannon balls.


Till next time,
Jen

Friday, August 10, 2012

DIY Oatmeal Packet Tutorial

Sorry for the wait. As promised here is the Oatmeal Packet tutorial. I used a sewing machine for this. I know it sounds strange but .... IT WORKS!

You will need:
Sewing Machine
Lunch size paper bags (I used the larger sized bags)
Thread

1. Take your flat paper bag and fold the bottom in half. Stitch up the end right above the bottom. I sat and did this two all 8 bags I used for making oatmeal with.

2. Sew another seam all the way across 5 inches above the last seam.

3. cut all the way across directly below the second seam sewn.

4. Now you will want to lay all of your packets out and dispense your ingredients for your oatmeal packets. You can find my recipes here.

5. After you have all the bags filled you can stitch up the other end. Make sure to push all of the oatmeal to the end of the bag that is already sewn.

6. Now you can decorate the front. Make sure you don't push through the bag! I used some crayons to decorate ours!

Enjoy,
Jen


Tuesday, May 8, 2012

DIY Popcorn

Both our boys love popcorn but the store bought popcorn packets are so expensive. I thought about buying an air popper but then I read somewhere that you can put straight up popcorn kernels in the microwave and they will pop. I thought to myself - Dear Lord instant popcorn is the biggest facade! So I made my own insant popcorn packets. You could proably just put them together at the time you want the popcorn but I work full time so if its going to get eaten in our house it needs to be pre-packaged and done.  here is what I did. Its simple, easy and CHEAP! 


You will need:
Paper Lunch style bags
Popcorn kernels (1/4 C per bag)
A Pen - I used a sharpie that was lying around
A plastic baggie (if you so desire - I resue these since they don't get dirty)

For each paper bag you will want to throw in aproximately 1/4 cup of popcorn kernels. Fold up the bag and insert into the plastic bag (optional).  
When you are ready to enjoy your popcorn just place it into the microwave for aprox 2 mins or you can put it on your popcorn setting. Just like the store bought popcorn says stop once the kernals stop popping or are popping longer than 3 seconds.
Now you can add salt, pepper, or whatever suits you! On move night we tossed it in a bowl and added melted butter for the boys. I take mine bare! Wasn't that EASY!


Enjoy,
Jen

Saturday, May 5, 2012

Teacher appreciation baking mitt

Happy Friday!

Today is the last day of teacher appreciation week. Because there are 5 teachers between both of our kids (they are both in pre-school) my budget for teacher gifts was stretched pretty thin. But I found this idea from Skip to my Lou. I found everything needed at the Dollar Tree minus the candy that I purchased at Target. Skip to my Lou also has printable tags! Here are pictures of the oven mitts for the boys teachers.
I included 1 oven mitt, pencils, pens, marking pens, scissors, glue, Air Heads candy, & Twix candy. I calculated it out and I only spent 7.15 per teacher which is pretty cheap!

Enjoy,
Jen

Wednesday, May 2, 2012

Bruschetta

This last weekend the hot weather finally broke and it started feeling more like October. So for lunch on Saturday my DH and I decided on spaghetti and wine. We had just purchased some rosemary crisps at Trader Joe's and I had to come up with an excuse to eat them. I remembered I had a bunch of tomatoes left and needed to eat them so I decided to make bruschetta! I looked all over the web and couldn't find one recipe that really did it for me so I made my own.

What you need:
3 tomatoes
1/4 onion
2 cloves Garlic
Salt
Pepper
Olive oil
Balsamic vinegar

First chop your to tomatoes and onions. I de-seed the tomatoes as I go.
Next mince the garlic or put it through a press.
Add the tomato, vinegar, and oil to a bowl and let it marinade.
As your tomatoes are marinading olive oil to a small pan and simmer the onions and garlic till transparent. You can skip this and add them directly to the bowl but I personally get indigestion when I eat raw onions.
Add the onions and garlic to the bowl. Mix together and add your salt and pepper to taste.

If you don't have crisps you can make your own. Preheat your oven to 400. Slice a baguette or Italian bread and on a diagonal at about 1/2" slice. Brush with olive oil and place them on a sheet oil side down. Place in the top rack for 5 to 6 mins.

DIY snow candles - ready to publish

I saw these great vases in a online DIY that had Epsom salt in them to mimic snow. I thought to myself what a great idea, but I thought what am I going to put in them and what to do with all that Epsom salt when its done? Well I decided to coat some candles with it. Here is what I did.
First I put a bunch of the Epsom salt in a bowl.
Then I placed a paper towel around the area I didn't want the salt.
I sprayed the uncovered area with Elmer's spray glue.
Then you roll your candles in the Epsom salt
Here is what they look like done.
Easy Peasey Just like that!

DIY Instant Oatmeal Packets

You may already know our son Xavier has ADHD. In an effort to keep it under control I have cut refined sugar (among other things) from our diet. Instant oatmeal packets have a lot of added refined sugar (and other gobbly gook) so I decided to make our own. I looked at several sites and ended up making my own recipes (I don't usually do this)! Here is what I came up with. 

Here are the basics that you will need: 

Oatmeal (I used quick cooking oats for my kids)
Oat flower OR you can blend 1/2Cup of oats in a food processor or blender
Fat free dried milk
For the Blueberry, Banana, & Strawberry packets I purchased freeze dried fruit at Trader Joe's
If making Raisins packets you will need Raisins, cinnamon, & brown sugar. If you want to be creative you can add other ingredients like flax seeds, bulgur, or whatever! 

Don't ask why baking powder is in this picture (it was late)!

I decided to make my own oatmeal packets from paper bags. I will create a tutorial for this in case you want to make your own. You could just use plastic baggies but those I can't throw into my compost bin!

DIY oatmeal packet recipe ingredients are per oatmeal packet
1/4C Oats
2 TBSP Oat flower
2 TBSP of preferred fruit
1 TBSP powdered milk ( I didn't use this for the raisins packet)
2 TSP brown sugar (raisin packet only)


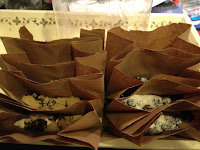
Even though I made 4 different flavors I set mine up assembly line style. 


After they were fully assembled I colored them with crayons. I let the boys help me decide what we were going to name them. 

Enjoy!
~Jen

Thursday, April 26, 2012

Lazy Chicken Parmesan

Last night we had Chicken Parmesan. This is so easy to make! This is enough for my husband and I and our two kids with some leftovers.

You will need:
One package of chicken breasts or chicken tenders.
One bottle of Spaghetti sauce
Pasta
Mozzarella Cheese (you don't need all that is shown just about 5 slices)

1. Add your chicken to the crock-pot
 2. Pour in the pasta sauce
 3. Turn it on and let it cook for 8 hours (mine always cooks longer since I have to pick up my kids from school after work).
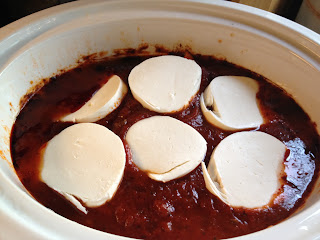
 4. When you get home add slices of your mozzarella and let it melt. While your cheese is melting whip up some pasta.
 5. Dish up your pasta with your Chicken Parmesan on top. Now eat and enjoy!!!